废话不多说,主要分为两种模式,有的主机商的设置是eth1 eth2……还有的是eth0 eth0:0 eth0:1,我们分别来看看。
eth1 eth2
0.准备工作
将系统镜像源更换到国内
https://mirrors.tuna.tsinghua.edu.cn/help/debian/
https://mirrors.tuna.tsinghua.edu.cn/help/ubuntu/
这里提供两个清华源的说明 其他的可以自行发挥
1.首先第一步 确保可以安装curl和ifmetric软件包
apt update
apt install curl
apt install ifmetric
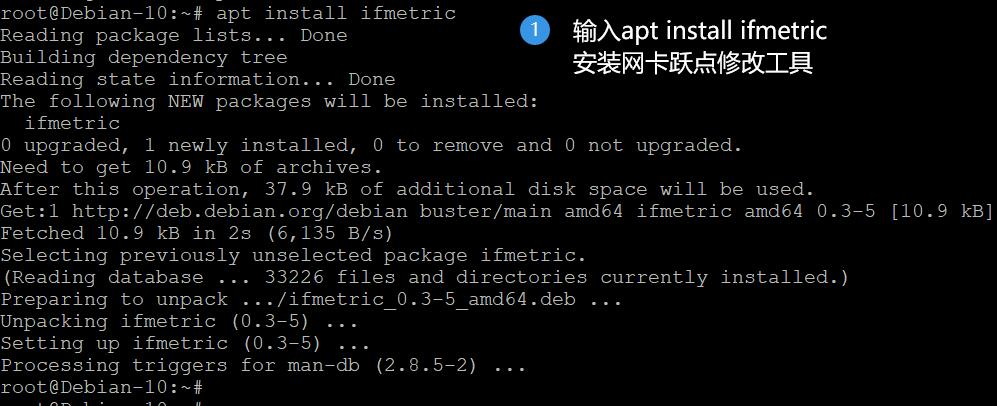
输入以上三条指令 运行没有报错 可以执行curl和ifmetric准备工作就好了
2. 查看机器内ip和网卡的关系
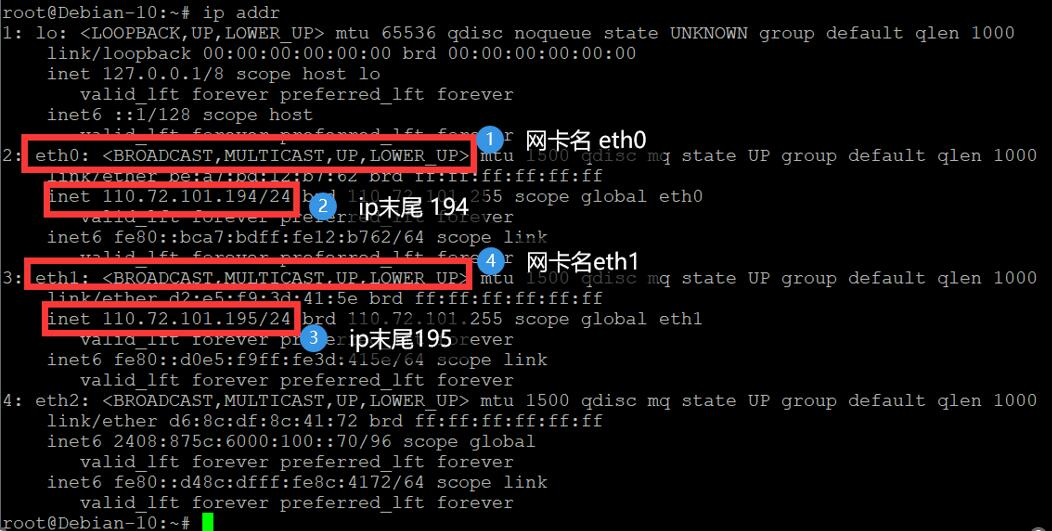
可以看到 我们默认的出口IP是末尾194的ip 默认的网卡是eth0 本文我们的目标是修改出口到末尾195的ip 实现出口切换

通过curl工具访问ip.sb可确认ip目前仍停留在194
目前已知有 194 195俩ip 194对应eth0 195对应eth1
3.切换网卡优先级 添加出口网卡默认路由
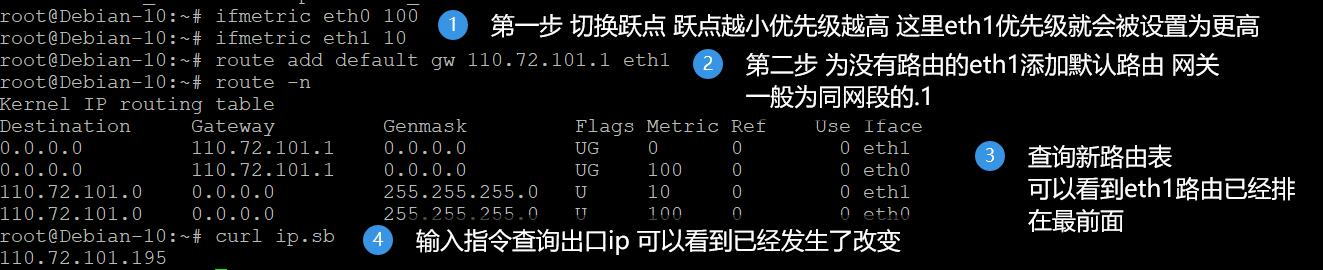
首先 输入route -n查询一下修改前的路由表 可以看到网关地址 如果是不同网段的两个ip 网关地址默认一般为.1 如果有问题 可以工单咨询客服

然后输入以下指令 进行网卡跃点的修改以及出口网卡的路由添加
ifmetric eth0 100 #将eth0跃点设置为100 使其优先级降低
ifmetric eth1 10 #将eth1跃点设置为10 使其优先级提高
route add default gw 110.72.101.1(请替换为实际的网关地址) eth1 #将eth1的默认出口路由添加到路由表
route -n #展示新路由表
curl ip.sb #查询出口ip
这样操作过后 理论上出口ip已经被修改为eth1的195了 让我们输入指令查询验证下
注意:此操作非永久生效 VPS重启后需要重新修改!
eth0:0 eth0:1
我们先看一段网卡配置:
auto lo
iface lo inet loopback

# The primary network interface
auto eth0
iface eth0 inet static
address 92.118.228.77
netmask 255.255.255.0
gateway 92.118.228.1
auto eth0:0
iface eth0:0 inet static
address 92.118.228.219
netmask 255.255.255.0
gateway 92.118.228.1
auto eth0:1
iface eth0:1 inet static
address 92.118.228.221
netmask 255.255.255.0
gateway 92.118.228.1
auto eth0:2
iface eth0:2 inet static
address 92.118.228.44
netmask 255.255.255.0
gateway 92.118.228.1
iface eth0 inet6 static
        accept_ra 0
        address 2607:f358:001a:000e:0000:0000:87e2:ee90
        netmask 64

        gateway 2607:f358:1a:e::1
我们可以知道默认的IPV4出口IP是92.118.228.77,我们现在要改成92.118.228.219,操作如下:
ip route change default via 92.118.228.1 dev eth0:0 src 92.118.228.219
References
https://www.haiyun.me/archives/1399.html