前言
有时候我们需要DD纯净的系统,原来的机器是双IP的,目前大多数DD脚本运行重启后,都会丢失双IP配置,所以我们需要手动修改网卡配置。
Debian/Ubuntu系
目前有的新的系统已经不在采用/etc/network/interfaces来配置网卡信息了,而采用Netplan了,我们还是首先先介绍下interfaces的配置方法。
interfaces
假设原本的参数是:
# Generated by SolusVM

 auto lo
  iface lo inet loopback

 auto eth0
  iface eth0 inet static
   address 194.33.39.1
   gateway 194.33.39.1
   netmask 255.255.255.0
   dns-nameservers 8.8.8.8 8.8.4.4

 auto eth0:0
  iface eth0:0 inet static
   address 194.33.39.2
   gateway 194.33.39.1
   netmask 255.255.255.0
   dns-nameservers 8.8.8.8 8.8.4.4
自己DD后的参数如下:
# This file describes the network interfaces available on your system
# and how to activate them. For more information, see interfaces(5).

source /etc/network/interfaces.d/*

# The loopback network interface
auto lo
iface lo inet loopback

# The primary network interface
allow-hotplug ens3
iface ens3 inet static
    address 194.33.39.1/24
    gateway 194.33.39.1
    # dns-* options are implemented by the resolvconf package, if installed
    dns-nameservers 8.8.8.8
我们只需要把allow-hotplug改成auto,并新增加一个网卡:0就可以。
# This file describes the network interfaces available on your system
# and how to activate them. For more information, see interfaces(5).

source /etc/network/interfaces.d/*

# The loopback network interface
auto lo
iface lo inet loopback

# The primary network interface
auto ens3
iface ens3 inet static
    address 194.33.39.1/24
    gateway 194.33.39.1
    # dns-* options are implemented by the resolvconf package, if installed
    dns-nameservers 8.8.8.8

auto ens3:0
iface ens3:0 inet static
    address 194.33.39.2/24
    gateway 194.33.39.1
    # dns-* options are implemented by the resolvconf package, if installed
    dns-nameservers 8.8.8.8
Netplan
说明
Ubuntu从18.04开始就使用Netplan来进行IP地址的管理,跟以前添加IP地址的方法有所区别;
添加IP
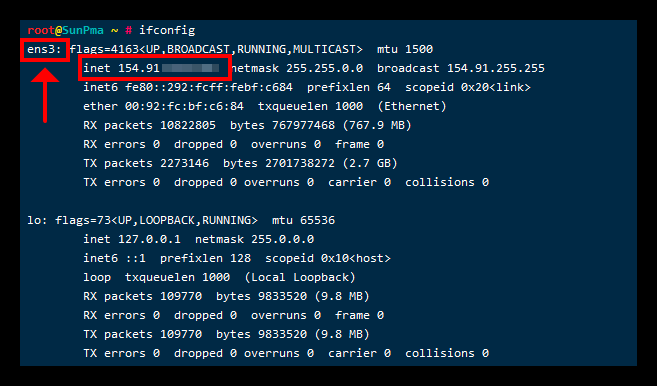
首先使用ifconfig命令查看网卡及网络配置情况;
如下图所示,我的网卡名称为ens3配置有一个IPv4地址;
然后查看Netplan默认配置文件名称
# 命令:
ls /etc/netplan/
# 示例:
root@SunPma ~ # ls /etc/netplan/
01-netcfg.yaml我的Netplan默认配置文件名称为01-netcfg.yaml
然后我们编辑这个默认配置文件:
vi /etc/netplan/01-netcfg.yaml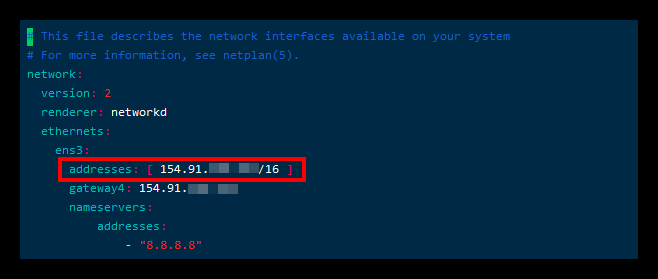
编辑对应的网卡信息,我的网卡名称是ens3其中addresses即是你的IP地址
如需添加额外IP地址,就在其下面添加一行addresses信息
示例:
额外为其添加了两个IP地址
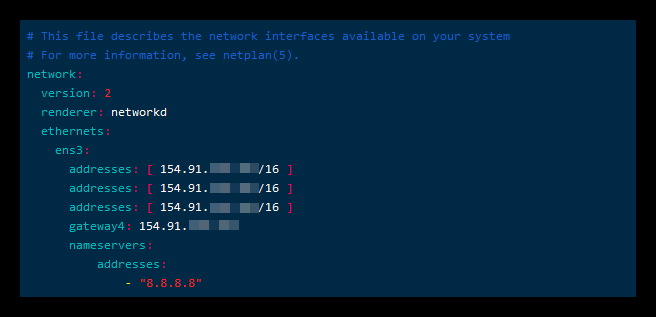
添加完成后保存退出,然后重启网络使其生效即可;
netplan applyCentOS7
方法1:少量IP手动绑定(这里以绑定IP到eth0为例,其它网卡的话修改相应的文件名即可)
1.复制ifcfg-eth0的网卡配置文件并改名为ifcfg-eth0:0
[root@akinlau /]# cp /etc/sysconfig/network-scripts/ifcfg-eth0 /etc/sysconfig/network-scripts/ifcfg-eth0:0
2.编辑ifcfg-eth0:0文件
[root@akinlau /]# vim /etc/sysconfig/network-scripts/ifcfg-eth0:0

DEVICE=”eth0:0″ //这里修改为eth0:0跟文件名保持一致
BOOTPROTO=”static” //协议为静态,用none也可以
HWADDR=”00:0C:29:6F:62:A7″ //MAC地址
ONBOOT=”yes” //开机启用此网卡
IPADDR=192.168.1.3 //新绑定的IP
NETMASK=255.255.255.0 //子网掩码
GATEWAY=192.168.1.1 //网关
修改好后保存退出,然后启用这张网卡
[root@akinlau /]# ifup eth0:0
注:有人在这一步喜欢用service network restart重启网络,其实这是没必要的,只需要启用这张网卡就可以了
然后再试ping 一下,如果能ping通的话,就可以了。
方法2:自动绑定一个IP段或多个IP段(同样这里以eth0为例,其它网卡的话修改相应的文件名即可)
1.新建ifcfg-eth0-range0文件(注意这里的文件名不要调换range的位置或写错单词,不然的话绑定的IP是不会生效的,如果你还有几段IP要绑定到eth0上的话,你可以再新建ifcfg-eth0-range1, ifcfg-eth0-range2等文件,不过这里要注意每个range文件中的定义的CLONENUM_START值不能重叠,不然的话会出问题。 )
[root@akinlau /]# /etc/sysconfig/network-scripts/ifcfg-eth0-range0
#写入以下内容
DEVICE=eth0 //绑定IP段的网卡名称
ONBOOT=yes //开机启用此网卡
BOOTPROTO=static //协议为静态
IPADDR_START=192.168.0.101 //网段的起始IP
IPADDR_END=192.168.0.120 //网段的截止IP
NETMASK=255.255.255.255 //子网掩码
CLONENUM_START=0 //这个数字是网卡别名的开始位置,比如这里的3是指eth0:0,并且会把IPADDR_START设置的IP192.168.0.101绑定到eth0:0上,以此类推
NO_ALIASROUTING=yes //这个参数的作用是数据包始终通过eth0进出,不走网卡别名(如eth0:0),设置这个参数可以加快路由的响应速度,所以强烈建议配置。
修改好后保存退出,然后重启网络:
[root@akinlau /]# service network restart
再测试一下,能不能ping就大功告成了。
其他
最近给vps多加了一个ip地址,系统是Debian10,原来只有1个网卡1个ip地址
网卡的名字是:eno1
ip地址是:192.168.100.123/24
新增加的ip地址是:192.168.103.125/24
Debian10的配置文件是/etc/network/interfaces,修改之前备份一下原来的配置文件,避免出错。改完后的配置文件如下:
# This file describes the network interfaces available on your system
# and how to activate them. For more information, see interfaces(5).

source /etc/network/interfaces.d/*

# The loopback network interface

auto lo
iface lo inet loopback

# The primary network interface
allow-hotplug eno1
iface eno1 inet static
        address 192.168.100.123/24
        gateway 192.168.100.1
        # dns-* options are implemented by the resolvconf package, if installed
        dns-nameservers 127.0.0.1

auto eno1:1
iface eno1:1 inet static
        address 192.168.103.125
        netmask 255.255.255.0
其中新添加的是后面4行
auto eno1:1
iface eno1:1 inet static
        address 192.168.103.125
        netmask 255.255.255.0
PS:新添加的网卡不需要添加网关
添加完成后,如果没有vnc,最好重启VPS,如果使用/etc/init.d/network restart则会可能造成网络断开,而SSH连接不上:
重启完成后就可以了。。
References