原理
WARP 是 Cloudflare 提供的一项基于 WireGuard 的网络流量安全及加速服务,能够让你通过连接到 Cloudflare 的边缘节点实现隐私保护及链路优化。其连接入口为双栈 (IPv4/IPv6),因此单栈服务器可以连接到 WARP 来获取额外的网络连通性支持。
比如可以让仅具有 IPv6 的服务器直接访问 IPv4 网络,不再局限于 DNS64 的束缚,能自定义任意 DNS 解析服务器,对于科学上网会有很大的帮助;也能让仅具有 IPv4 的服务器获得 IPv6 网络的访问能力,可以作为 IPv6 Only VPS 的 SSH 跳板。
翻译成人话
让你的vps通过这种方式有了ipv6,从而解锁服务器所在地的流媒体,比如Netflix。
目录
安装 WireGuard
apt update

apt install curl sudo lsb-release -y
添加 backports 源
echo "deb http://deb.debian.org/debian $(lsb_release -sc)-backports main" | sudo tee /etc/apt/sources.list.d/backports.list
su root
sudo apt update
安装网络工具包
sudo apt install net-tools iproute2 openresolv dnsutils -y
安装 wireguard-tools
sudo apt install wireguard-tools --no-install-recommends
先执行 uname -r 命令查看内核版本。如果是 5.6 以上内核则已经集成了 WireGuard ,就不需要安装了。如果不是,执行下面的命令
sudo apt -t $(lsb_release -sc)-backports install linux-image-$(dpkg --print-architecture) linux-headers-$(dpkg --print-architecture) --install-recommends -y重启
reboot
查看版本( 5.6 以上就可以了)
uname -r
使用 wgcf 生成 WireGuard 配置文件
wgcf 是 Cloudflare WARP 的非官方 CLI 工具,它可以模拟 WARP 客户端注册账号,并生成通用的 WireGuard 配置文件。
安装 wgcf
curl -fsSL git.io/wgcf.sh | sudo bash
注册 WARP 账户 (将生成 wgcf-account.toml 文件保存账户信息)
wgcf register
生成 WireGuard 配置文件 (wgcf-profile.conf)
wgcf generate
生成的两个文件记得备份好,尤其是 wgcf-profile.conf,万一未来工具失效、重装系统后可能还用得着。
编辑 WireGuard 配置文件
编辑wgcf-profile.conf文件,其中可以在服务器端解析 engage.cloudflareclient.com 的ip
nslookup engage.cloudflareclient.com
但大概率解析的结果为 162.159.192.1
将配置文件中的 engage.cloudflareclient.com 替换为 162.159.192.1,并删除 AllowedIPs = 0.0.0.0/0。即配置文件中 [Peer] 部分为:
[Peer]
PublicKey = bmXOC+F1FxEMF9dyiK2H5/1SUtzH0JuVo51h2wPfgyo=
AllowedIPs = ::/0
Endpoint = 162.159.192.1:2408
额外操作
每个人的vps配置文件中默认的 DNS 都不一样, 1.1.1.1。由于它将替换掉系统中的 DNS 设置 (vi /etc/resolv.conf),同时为了防止单 DNS 服务器故障导致无法解析,建议使用不同组织提供的公共 DNS 服务器组合。以下配置供参考,小伙伴们请根据实际情况来填写。
DNS = 9.9.9.10,8.8.8.8,1.1.1.1,8.8.4.4
启用 WireGuard 网络接口
将 WireGuard 配置文件复制到 /etc/wireguard/ 并命名为 wgcf.conf。
sudo cp wgcf-profile.conf /etc/wireguard/wgcf.conf
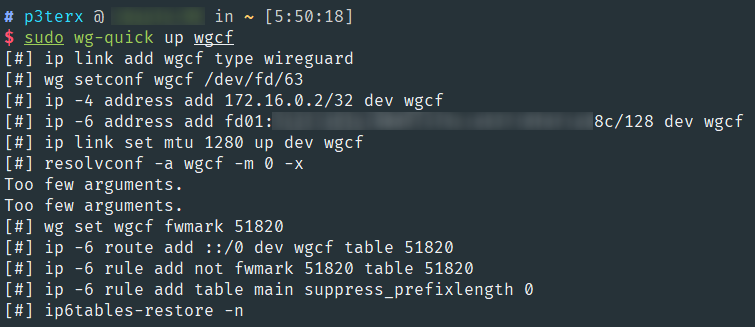
开启网络接口(命令中的 wgcf 对应的是配置文件 wgcf.conf 的文件名前缀)。
sudo wg-quick up wgcf 行执行
行执行ip a命令,此时能看到名为wgcf的网络接口,类似于下面这张图:

执行以下命令检查是否连通。同时也能看到正在使用的是 Cloudflare 的网络。
curl -6 ip.p3terx.com
测试完成后关闭相关接口,因为这样配置只是临时性的。
sudo wg-quick down wgcf
正式启用 WireGuard 网络接口
# 启用守护进程
sudo systemctl start wg-quick@wgcf
# 设置开机启动
sudo systemctl enable wg-quick@wgcf
安装xray一键脚本
这里建议安装wulabing大佬的脚本,七合一的修改方式略有不同,大家仔细研究
wget -N --no-check-certificate -q -O install.sh "https://raw.githubusercontent.com/wulabing/Xray_onekey/main/install.sh" && chmod +x install.sh && bash install.sh
修改xray的ipv6优先
xray配置文件目录地址
/usr/local/etc/xray/
编辑config.json
替换整个 “outbounds”命令
 "outbounds": [
    {
      "tag":"IP4_out",
      "protocol": "freedom",
      "settings": {}
    },
    {
      "tag":"IP6_out",
      "protocol": "freedom",
      "settings": {
        "domainStrategy": "UseIPv6" // 指定使用 IPv6
      }
    }
  ],
  "routing": {
    "rules": [
      {
        "type": "field",
        "outboundTag": "IP6_out",
        "domain": ["geosite:netflix"] // netflix 走 IPv6
      },
      {
        "type": "field",
        "outboundTag": "IP4_out",
        "network": "udp,tcp"// 其余走 IPv4
      }
    ]
  }
}
另外的使用场景:例如google
还有一种情况,就是你的小鸡使用的是垃圾ip,每次看YouTube的时候或是看google的时候,都会跳出提示,让你验证,这个是因为你的vps的ipv4被拉黑或是共享ip。每次提示都很烦人,那么我们也可以把google和YouTube加入的走ipv6的线路。
还是上面的代码,只有改其中一行就行
"domain": ["geosite:netflix","geosite:google","geosite:youtube"] // netflix google YouTube走 IPv6
xray重启
systemctl restart xray
检查是否xray报错
systemctl status xray
复查其他线路有没有走ipv6
https://test-ipv6.com/index.html.zh_CN
ipv6测速
curl -fsSL git.io/speedtest-cli.sh | sudo bash
speedtest
解锁检测
yum install -y curl jq 2> /dev/null || apt install -y curl jq && bash <(curl -sSL https://raw.githubusercontent.com/Netflixxp/NF/main/nf.sh)
ps:教程来源于
https://p3terx.com/
https://bbs.zsxwz.com/
https://toutyrater.github.io/app/netflix.html
如有大佬补充,不胜荣幸


emuler
April 19th, 2021 at 09:18 am
设置网络IPv6优先:
编辑 vi /etc/gai.conf 文件,在末尾添加下面这行配置:label 2002::/16 2
建议采用一键添加命令,如下:
grep -qE ‘^[ ]*label[ ]*2002::/16[ ]*2’ /etc/gai.conf || echo ‘label 2002::/16 2’ | sudo tee -a /etc/gai.conf
最后验证优先级,执行 # curl ip.p3terx.com 命令,显示 IPv6 地址则代表 IPv6 优先,否则为 IPv4 优先。
接下来,就可以不是非得安装Xray和改写json啦;就算安装Trojan啥的也行,只不过出去的模式要选择全局。